How to change applications and folder icons in Windows 10
When you install an application on your Windows PC, its shortcut in form of an icon is created on the desktop and added to the start menu.
An icon is a small pictorial representation of a program, feature, or file usually displayed on a computer screen to help users to navigate easily through the computer system and in various applications.
Clicking on an icon launches the application or opens the file, or feature associated with it.
If you are so much into personalization and customization, you may want to change the application icons to more visually appealing ones.
In this article, I will show you how to change the default icons for various applications and folders on your Windows PC and replace them with custom icons.
How to change the application icons on Windows
There are two ways in which you can change the applications icons on Windows:
- Replacing with available built-in options
- Replacing with custom external icon file
The process is the same for the two methods but only differs at the point of new icon selection.
Below is the Windows 10 desktop screen with some application shortcut icons. Using the first method, we will change the icon for Google Chrome, and using the second method we will change the icon for Mozilla Firefox.
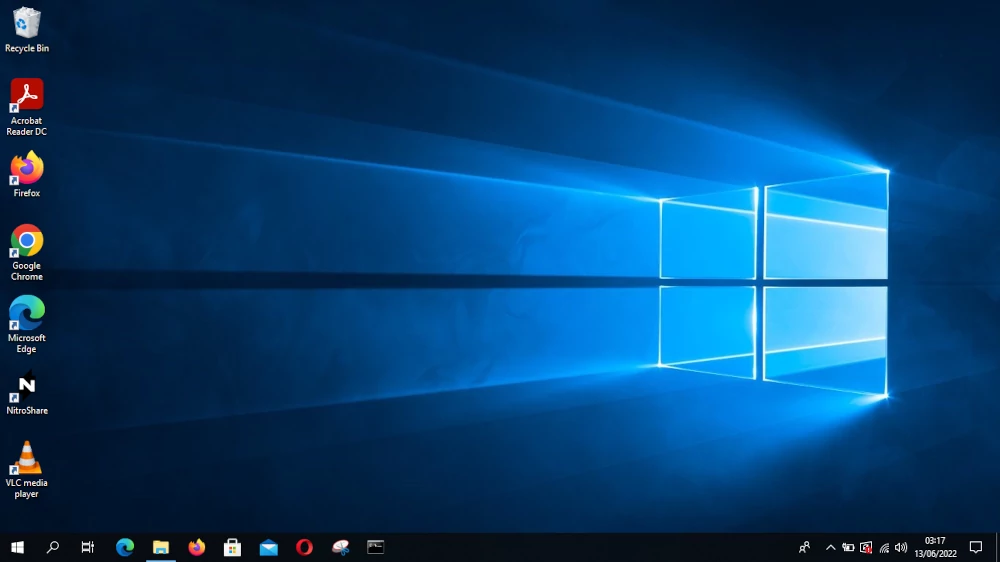
Replacing default icon with available built-in options
Follow the steps below:
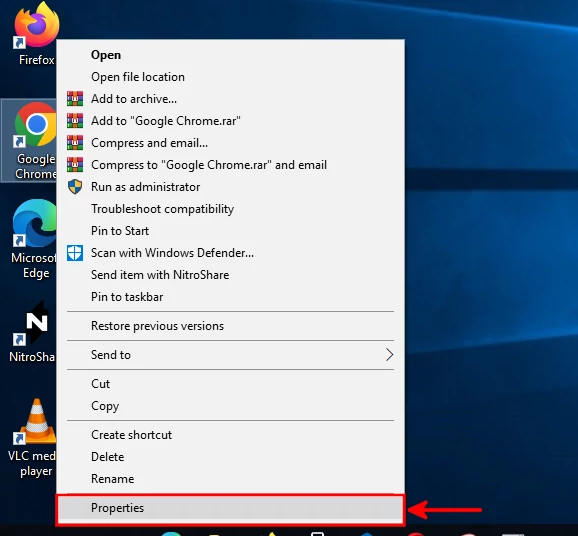
Step 1: Right-click on the application icon that you want to change. Then click on the Properties option of the context menu.
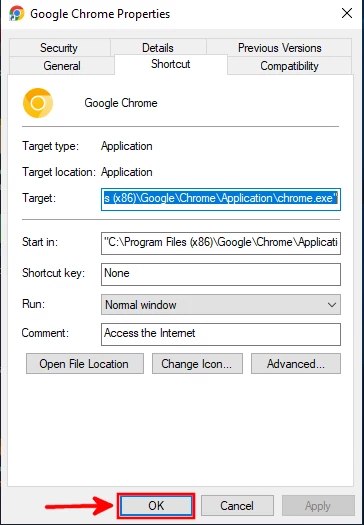
Step 2: A small window will open. Navigate to the Shortcut tab and then click on the Change Icon button.
Step 3: Another small window will open with a list of available icons to choose from. Click on your preferred icon to select it and then click on the OK button.
Step 4: The small window will close and now you will be able to see the selected icon displayed next to the application name at the top of the Shortcut tab of the application's properties window. Click on the Apply button to apply the changes.
Step 5: A small popup window will appear prompting you to provide administrator permission to change the settings. Just click on the Continue button to proceed.
Step 6: Click on the OK button to exit the properties window.
Now the old app (Google Chrome) icon has been replaced with the one we just selected from the options. It's that easy.
Replacing an app icon with a custom external icon file
In most cases for most of the applications, you won't find an appealing icon to choose from in the available options. In such a case, you will need to use a custom icon file, which you will browse from your computer storage.
Follow the steps below:
Step 1: Prepare the icon file that you will use in replacing the default one.
You can make this file yourself using tools such as Photoshop, GIMP, etc (if you are a designer). Alternatively, you can download it from the web. A simple Google search is guaranteed to give you many desirable custom icons to choose from.
Below is a list of a few websites on which you can get good icons for free.
Just search the app name on these sites or browse through categories. It's advisable to download the icon in PNG format.
Microsoft Windows works with ".ico" files for icons, so you will need to convert the icon to ICO format.
You can convert the icon file format easily by opening it in design tools such as Photoshop or GIMP and exporting it with a ".ico" extension. Alternatively, there are free online tools that allow you to do file conversion.
A good example of an online tool to use is ConvertICO. It allows you to upload PNG image files and download converted ICO files in a matter of seconds. You just drag and drop your files or click inside the box to select the file(s) from your device storage and then click on the download (arrow) buttons on the right side of each of the converted files.
Save the ICO icon file(s) into a folder that you will keep permanent in your computer storage.
Step 2: Right-click on a desktop icon that you want to replace and then click on the Properties option of the context menu.
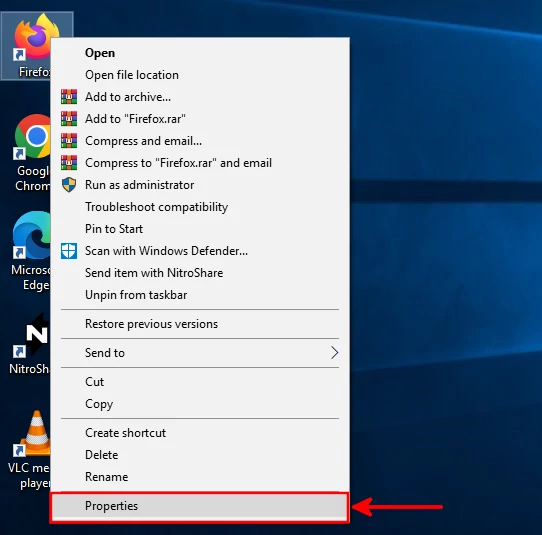
Step 3: In the application properties window that opens, navigate to the Shortcut tab. Then click on the Change Icon button.
Step 4: A small window will open with some icons to choose from and also the option to browse for an icon file from your computer storage. Click on the Browse button.
Step 5: A dialog box will open to allow you to select the icon file. Browse through your computer storage to the folder in which you have saved the icon that you want to replace the current with. Click on the icon file to select it. Its name will appear at the "File name" input box at the bottom once selected. Click on the Open button to proceed.
Step 6: The selected icon will be previewed, click on the OK button to confirm the selection.
Step 7: The new icon will be displayed at the top of the tab next to the application's name. Click on the Apply button.
Step 8: Click on the Continue button if you get prompted to provide administrator permission.
Step 9: At this point, the icon will be updated on the desktop shortcut. Click on the OK button to exit the window.
Now you will be able to see that the custom icon that you just set has replaced the default app icon.
You can change it to any other icon file or reverse it to the default one. All you need to do is repeat the same process.
How to change folder icons on Windows
In addition to changing the icons for applications on your Windows PC, you can also customize your folders in Windows File Explorer to have new, personalized, and more visually appealing icons.
There are basically no better-looking built-in folder icons than the default one in Windows. Therefore, we will only cover how to use external custom icons.
We have these four folders located in the File Explorer "Pictures" folder, which we will be replacing their icons in this guide.
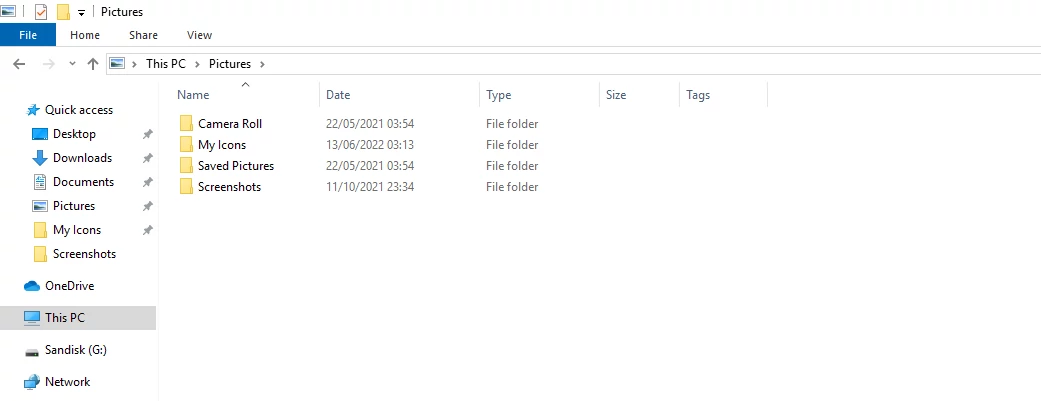
Follow the steps below to replace the default folder icon with a custom one in windows:
Step 1: Prepare the ICO file to use as the folder icon. In the same way, as described above on replacing an app icon with a custom icon file, you can download a cool folder icon from the web or make one yourself. Remember to have it as a ".ico" file and save it somewhere it will remain permanent on your computer's storage.
Step 2: Open the Windows File Explorer and navigate to the location where the folder whose icon you want to change is located. Right-click on the folder and open its Properties from the context menu.
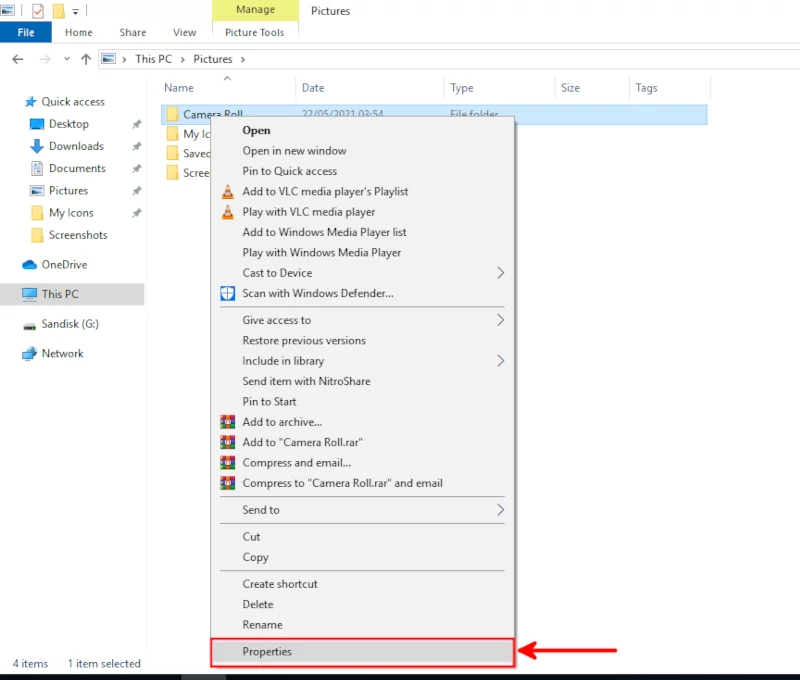
Step 3: The folder's properties window will open. Open the Customize tab and then click on the Change Icon button.
Step 4: A small window will open with tons of icons to choose from. Click on the Browse button.
Step 5: A dialog box will open to allow you to select an icon file from your PC storage. Browse through your computer to the folder where the icon is stored. Click on the icon to select it, then click on the Open button.
Step 6: Your selected icon will be previewed. Click on the OK button.
Step 7: Click on the Apply and then on the OK buttons.
Your cool custom folder icon will now replace the default one. To change or replace this icon with a different or the default one, repeat the same process. I used the same process to change the icons for the other 3 folders as shown in the image below.
Conclusion
Icons are very crucial in computing. They help the computer user to easily recognize applications and to also to navigate through the computer system.
Out of curiosity or love of customizations, you may want to change the default application icons on your computer and replace them with custom icons or from other built-in icons.
In this article, we have covered in detail how to change the default applications and folders icons either with other built-in icons or with custom external icon files.
It's my hope that you found this article useful and have the answer you were looking for.
